A step-by-step guide to calibrating a touchscreen on Wayland
This is a step-by-step guide for Linux DE users to calibrate a touchscreen on Wayland manually.
The target of this guide
I suppose you have two or more screens, and at least, one of them is a touchscreen. This is because most touchscreens work without calibration if it's alone.
Prerequisites
- A Linux computer that Wayland display manager is installed
- A touchscreen
- Any other screen
Things you should know before
In this guide, you will modify the udev (Linux's device manager) attributes. This won't brick your devices in most cases, but be careful, because the changes may affect your physical devices.
Steps
1. Install libinput
libinput is needed to check your target device's information. Installation candidates depend on your distribution and installation, so I will show you only common ones.
Ubuntu / Debian
APT has a strict dependency detection, so you should be able to install all dependencies by running the below command.
sudo apt install libinput-tools
Fedora / RedHat
sudo dnf install libinput libinput-utils
Arch Linux
sudo pacman -S libinput libinput-tools
2. Check the screen resolutions
Screen resolutions are necessary for calibration. Open the Settings app on your distribution, or run the following command to check the currently used resolution.
xrandr | grep \*
This will show the current resolution for your screen. If you have not installed XWayland, this command might not work.
Output example
WARNING: running xrandr against an Xwayland server. See the xrandr man page for details.
   2560x1600     59.81*+
   2240x1400     59.91*+
3. Check the touchscreen device information
Run the following command to check your touchscreen's information.
sudo libinput list-devices
This will show you all the devices available on your computer.
Output example:
Device:                  Wacom Co.,Ltd. Pen and multitouch sensor
Kernel:                  /dev/input/event3
Id:                      usb:2d1f:53d1
Group:                   1
Seat:                    seat0, default
Size:                    302x188mm
Capabilities:            touch
Tap-to-click:            n/a
Tap-and-drag:            n/a
Tap button map:          n/a
Tap drag lock:           n/a
Left-handed:             n/a
Nat.scrolling:           n/a
Middle emulation:        n/a
Calibration:             1.00 0.00 0.00 0.00 1.00 0.00 0.00 0.00 1.00
Scroll methods:          none
Scroll button:           n/a
Scroll button lock:      n/a
Click methods:           none
Clickfinger button map:  n/a
Disable-w-typing:        n/a
Disable-w-trackpointing: n/a
Accel profiles:          n/a
Rotation:                0.0
Area rectangle:          n/a
This command might return multiple devices with the same device name. In such cases, find the first entry that Capabilities attribution is touch.
Note the vendor and model in Id. In the example case, 2d1f is the vendor, and 53d1 is the model.
4. Calculate the matrix
Calculate the four following values to create the matrix.
| Element | Formula |
|---|---|
| a | [width for the touch area] / [total width] |
| b | [height for the touch area] / [total height] |
| c | [x offset for the touch area] / [total width] |
| d | [y offset for the touch area] / [total height] |
Matrix (as a row-by-row array):
a 0 c 0 b d
Example
I suppose there are two screens. The target touchscreen is 2240x1400, another screen is 2560x1600. The target monitor is put under the another monitor.
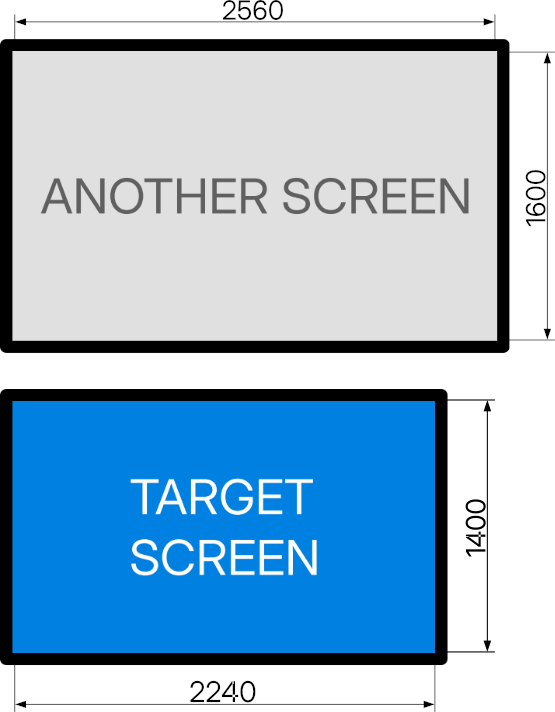
Then, use the formula to calculate the number of the element.
| Element | Formula |
|---|---|
| a | 2240 / 2560 = 0.875 |
| b | 1400 / 3000 ≈ 0.466 |
| c | 0 / 2560 = 0 |
| d | 1600 / 3000 ≈ 0.533 |
Finally, the matrix is determined.
Matrix (as a row-by-row array):
0.875 0 0 0 0.466 0.533
5. Create a rule file
You need to create a rule file to apply the calibration matrix to the system. Run the following command:
sudo nano /etc/udev/rules.d/99-touchscreen-calibration.rules
99 is the priority, represented in two digits of decimal (99 is the highest). touchscreen-calibration is a rule name you can choose.
In the text editor, add the following line:
ENV{ID_VENDOR_ID}=="[vendor name]",ENV{ID_MODEL_ID}=="[model name]",ENV{WL_OUTPUT}="DP-1",ENV{LIBINPUT_CALIBRATION_MATRIX}="[matrix]"
Fill [vendor name], [model name], and [matrix] with your own.
Example
ENV{ID_VENDOR_ID}=="2d1f",ENV{ID_MODEL_ID}=="53d1",ENV{WL_OUTPUT}="DP-1",ENV{LIBINPUT_CALIBRATION_MATRIX}="0.875 0 0 0 0.466 0.533"
Do not forget to save!
6. Apply the change
Run the following command:
sudo udevadm control --reload-rules
sudo udevadm trigger
Then, reconnect the screen physically.
Conclusion
Now you have successfully calibrated your touchscreen!
I hope that this article is helpful for you.